Mastering the Pen Tool in Photoshop
By Karl Rosencrants, Bigstock Contributor
Photoshop is known for its pixel editing capabilities, but that isn’t all it can do. It also has the ability to create and work with vector art. Working with vectors has advantages: It can help you create crisp graphics with great precision. Photoshop’s main vector tool is the Pen Tool.
Some beginners are intimidated by the Pen Tool because they don’t understand how it works. It is an incredibly powerful tool once you understand the basics. The Pen Tool works exactly the same in Illustrator as it does in Photoshop, so once you learn it in one program, you’ll be proficient in the other!
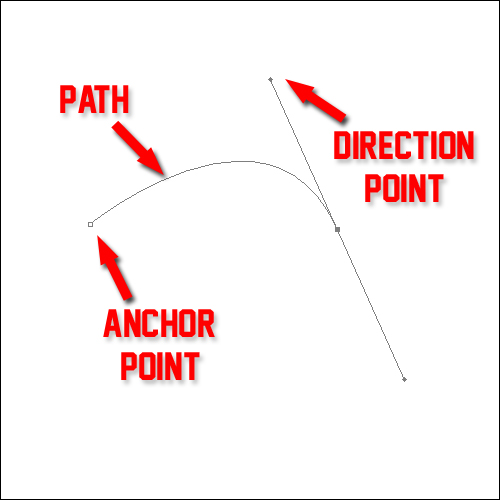
The Pen Tool works by using a series of Anchor Points, Paths and Direction Points to create complex paths in Photoshop. In this tutorial, we will use the Shape Layer option so that we can easily see the shape we are creating.
In Photoshop, once you activate the Pen Tool from the Tools Palette, there are two different options available in the Properties Bar.
The Shape Layer option will create a new layer in the Layers palette. The layer is automatically filled with the foreground color and is clipped to be visible inside the path area.
The Path option will create a new Work Path on the Path Palette.
With the Pen Tool active, click and release somewhere on the canvas. This places a single point on the canvas, called an Anchor Point.
Continue to click and release at various points on the canvas. The corners of the shape will be located at each dropped point and straight paths will connect each point. If you hover the mouse over the first point in the path, you will see a small circle appear next to the Pen Tool Cursor. If you click on the starting point, you will close the shape and make a complete path.
Curved paths are created by using Direction Points to control the shape of the curve. Start this next path the same way as the first path by clicking and releasing the mouse to set a single point. Then for the second point, click and hold the mouse button and drag the mouse away from the point.
Two Direction Points will expand from this new anchor point. These Direction Points are what control the shape of the path. Think of each Direction Point as a magnet. By activating the Direct Selection Tool, you can grab these Direction Points and drag them around. You can see the path shape follow the Direction Point.
To continue a Path, reactivate the Pen Tool and single click on an Anchor Point, and go on with the path. Continue to click, hold, and drag to set new Anchor and Direction Points until you complete the path.
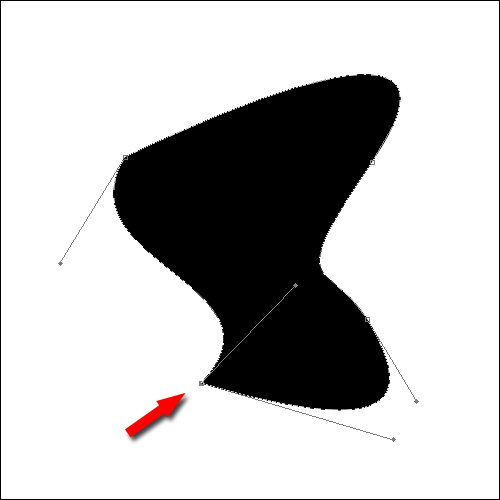
Once the shape is complete, you can activate the Direct Selection Tool to adjust the contours of the shape. Click on the Path to activate the Direction Points at either end of that section of Path, or click on an Anchor point to activate the two Direction Points to either side of that Anchor Point.
Notice that as the path was created, the Direction Points automatically lay on a straight line, directly parallel from each other. This creates a smooth transition of the path across that point.

Click and drag a Direction Point while holding CTRL or Cmd and it will break the straight Direction Line into two individual lines at the Anchor Point. Then each Direction Point can be moved independently from each other. This will create a sharp corner at the anchor point.
Using the Direct Selection Tool, you can also click and drag on a Path line to adjust its shape. As you drag the Path, you will see that the Direction Points automatically adjust to the new position of the Path.
To delete a section of Path, simple click on the Path segment with the Direct Selection Tool, then press Delete on the Keyboard.
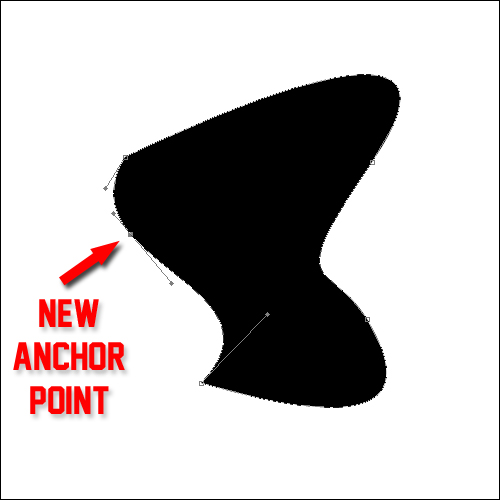
There are other Pen Tools in the Pen Tool family that we will touch on briefly. The Add Anchor Point Tool does exactly as its name implies. Clicking on an existing path will place a new Anchor Point in that position along the path. The Direction Points will be automatically set to match the shape of the Path. The path will not change shape with the addition of the new point.
The Delete Anchor Point Tool is also self explanatory. Clicking on an existing anchor point with this tool will remove it from the path. The path will readjust its shape to match the Direction Points of the remaining Anchor Points.
The Convert Point Tool will reset the Direction Points on the selected Anchor Point. If you click and release on an Anchor Point, all Direction Points will be removed. If you click, hold and drag, a new set of parallel Direction Points will be created.
The Free Form Pen Tool allows you to click, hold and drag the pointer around to draw out a shape. All the Anchor Points and Direction Points are automatically set once the mouse is released. Because the resulting path follows the exact path of the mouse, the path created will more often than not be rough and jagged in places.
Continue to practice with the Pen Tool to create shapes, precise clipping masks and other elements, and you will find yourself more comfortable with it in no time.
Was this helpful? Check out previous tutorials from Karl Rosenkrants here, and here


